DIY Busy Board
share on social:
I have three boys and one thing is for sure… they are always busy. They love playing with locks, switches, door handles, and zippers. Today I wanted to share how I made a DIY busy board that keeps them entertained and also helps improve their fine motor skills.
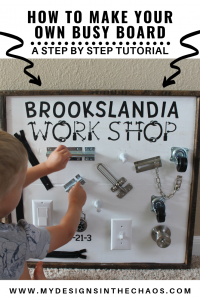
The cool thing about this DIY busy board project is that you can personalize it and add in whatever types of locks, switches, and door handles that you think your kids would love. I will link to the ones that I used but really there is no right or wrong way. Just make sure that whatever you choose they are secured properly onto the board so as not to cause injury to your little one.
PLEASE NOTE THAT THIS POST DOES CONTAIN AFFILIATE LINKS.
SUPPLIES
- Common Board
- Furring Strips
- Nail Gun
- White Paint
- Oramask 813
- Black Paint
- Transfer Tape
- Cutting Machine (a Silhouette or Cricut will work)
- E6000 glue
- Light Switch
- Light Switch Cover
- Door Handle
- Zippers
- Chain Lock
- Slide Lock
- Padlock
- Drill
- and any other accessories you would like to attach to the board
Step One
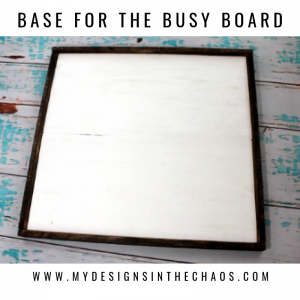
First you will need to assemble the base of the board. I love common board for this because it is strong and stable but also very affordable. Depending on how big you want the board you can use two smaller pieces of wood and attach them together or simply use one larger piece.
I also framed out my board to help make it look a little more finished and like a piece of decor. We have a full blog post on how to frame boards here.
Step Two
The next step is painting on the title of the board. Here are some ideas of what you could put:
- Child’s Name
- Workshop
- Tool Shed
- Construction Zone
- You could even make the board striped to look like a construction zone
This step really is optional for the DIY busy board but I love how it gives the project a personalized feel. I was able to use my cutting machine to cut out the stencil. Stencil Vinyl is a little bit different than other types of vinyl. If you are making a sign it is a MUST HAVE! Check out the different types of vinyl here.
I then weeded the stencil, applied transfer tape, and applied the stencil to my board. Once it was applied I painted it with chalk paint (my favorite to use on signs) and then peeled up the stencil.
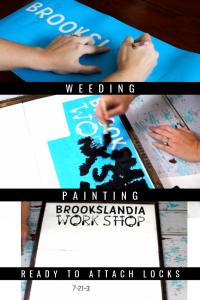
I did the same process with the numbers at the bottom. They are the code for the padlock just in case as my boys get older, they want to open it.
Step Three
Now comes the fun part! It is time to attach all the little gadgets to the board. Lay them all out on the board first to get an idea of where you want them to go. This also helps with spacing and making sure things look balanced. From there mark dots on your board in pencil where to attach what. Remove everything and then start to attach.
I grabbed most of my items from Walmart. You can see them pictured below. Amazon also has lots of options to choose from too.
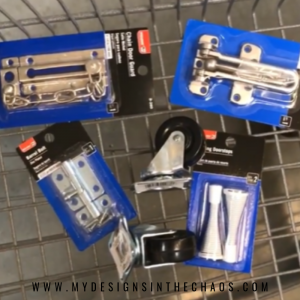
For items with screws it is pretty straight forward. I used the screws that came with each of the locks to attach them with a drill.
But with items like the padlock and the zippers there were a few options. The route I decided to go was to use the glue E6000. This was the simplest and most cost effective way to make sure they would stay attached for the long haul. That glue is crazy strong once you let it set for 24-72 hours. Those locks and levers aren’t going anywhere!
Step Four
Time to play! At this point you can attach the DIY busy board to a wall (make sure it is secured properly so that it won’t fall on little ones) or you can leave it mobile so that you can pull it in and out of the closet. You can also lay it flat on the ground for them to play with (it doesn’t have to be propped up). There are so many options. I know you will find one that is best for you and your kids.
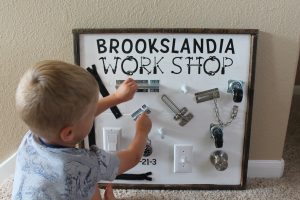
Also as a side note I wanted to mention that the font that I used on my Busy Board for the word Brookslandia can be found here and for the word workshop can be found here.
That tool font would be so cute on anything for Father’s Day as well and if you are looking for some Father’s Day inspiration, we have several funny Father’s Day free SVG files on the blog here. We would love it if you headed over and checked those out as well.
Also if you end up making your own DIY busy board we want to see! Tag us on FB, IG or show it off in our FB group. It is so much fun to see these projects come to life in different creative ways.
‘Til next time, happy crafting, cutting, and chaos!
Check out this quick tutorial video of how to put it all together here:

Learn to develop, and grow your crafting skills!
My mission is to develop, encourage, and grow your crafting skills, and confidence through freebies, tutorials, our club, and our signature course.
Behind the Chaos...
My name is Michelle and I am the creative director behind the chaos. I'm so are glad you are here and hope you find inspiration and confidence to create something beautiful out of the chaos in your craft room and in life.
free ebook!
Bring your creativity to life quickly and easily.
This guidebook will give you a detailed look into the creative crafting cycle called the Craft Maker Process.
